Written by Anton Solomin
Introduction
In this tutorial we’ll set up Salesforce to Whatsapp integration using a third-party API. Our goal is to be able to send and recieve messages, images and other types of files from/to Salesforce, to store the contents and to have the ability to automate the message exchange. We’ll have a general overview of the available options provided by Whatsapp and their partners. Additionally, I’ll provide some code samples to demonstrate how the integration can be used.
In this example we’ll be using existing back office as well as a Salesforce org as part of the integration where we’ll be recieving notifications of the result of the message request. Depending on your requirements and existing project structure you can consider having this part of the integration living in Salesforce.
By the end you will have:
- Ability to send and recieve Whatsapp messages via a visualforce page.
- A trigger to send automated messages
- Installed third party Chrome plugin provided by Waboxapp
For this tutorial I am assuming that you have some experience with Salesforce, Salesforce’s APEX, have Salesforce Enterprise edition and using Google Chrome browser.
Let’s get started.
What are the options to integrate with Whatsapp?
Facebook’s Whatsapp has made available several options for businesses depending on their size and needs.
For small buisinesses WhatsApp has provided the WhatsApp Business App. With it you can interact with your customers and have a way to sort and automate responces. It’s a great option, however if we want to be able to customize message content, automate and dynamically change the message throught Salesforce we’ll need to look at the other options.
For medium and large businesses Facebook has provided a directory of registered partners and their solutions. In this tutorial we’ll be looking at Waboxapp as the consultancy that is integrated with WhatsApp. There are many consultancies to choose from. Obviously the integration steps and results will vary depending on the consultancy of your choice.
One of the benefits of Waboxapp is that it provides a sandbox where you can test your integration. Furthermore, You can start using Waboxapp for free up to 100 messages a month to see if it works for you. Prices for this service are monthly payments that correspond the the volume of messages that use send from all your active accounts.
General project overview.
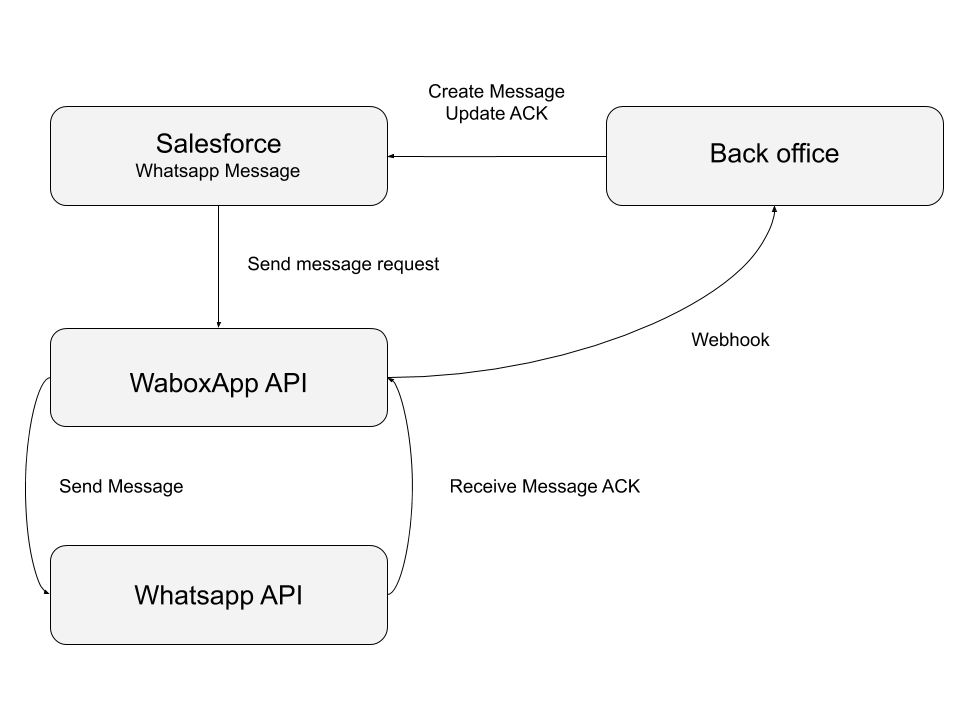
As you can see it fairly simple.
- We get the user input and insert the message in Salesforce.
- We make an API request to Waboxapp.
- Waboxapp notifies us about the result of the message.
- We update the message in Salesforce.
- Also, we do not need to have a back office for this integration, we can build this functionality in Salesforce. *
Setting up objects and fields.
First, let’s create our WhatsApp Message object. In this tutorial I’ll call it “WhatsApp Message”. If you choose to use another name make sure to change it in all occurences later in this tutorial. The fields that’ll need are:
- ACK. Picklist:
- sent
- delivered
- read
- not sent
- sending
- CID. Text 20.
- Message. Long Text for the message content. As of writing this article whatsapp maximum size is 65,536 characters.
- Status. Text 20.
- Relationship to the object that we’ll be using to exchange messages. In this example we’ll be linking the message to both Lead and Account. This relationship must be set according to your requirements.
Now let’s create the Whatsapp message chat in Salesforce.
For this we are going to need a visualforce page and it’s controller. Please note that lightning components or other frameworks can be used to achieve the result.
This controller that provides minimal functionality. Our goal here is to be able to send and see existing messages that are related to this record. It should be further developed and changed according to your requirements.
Note: replace double quotes with single quotes (syntax highlighter doens’t support Apex code yet).
public with sharing class WhatsAppController {

    public List<WhatsAppMessage__c> messages {get;set;}
    public String message {get;set;}
    public Boolean showStatus {get;set;}
    public String statusMessage {get;set;}
    public Object leadName {get;set;}
    public sObject record {get;set;}

    private User user;
    private String objectType;
    private String objectId;
    private String phone;

    public WhatsAppController(){
        this.objectType = ApexPages.currentPage().getParameters().get("object");
        this.objectId = ApexPages.currentPage().getParameters().get("Id");
        this.record = Database.query("SELECT Id, Name, Phone, OwnerId FROM " + this.objectType + " WHERE Id = :objectId");
        this.user = [
            SELECT u.SmallPhotoUrl, u.FullPhotoUrl, u.MobilePhone
            FROM User u
            WHERE u.Id =: String.valueOf( this.record.get("OwnerId") )
        ];
        this.leadName = record.get("Name");
        this.message = "Hello " + this.leadName;
        this.messages = getMessages();
    }

    public List<WhatsAppMessage__c> getMessages() {
        return Database.query("SELECT format(CreatedDate), Message__c, Status__c, Ack__c, createdby.FullPhotoUrl FROM WhatsAppMessage__c WHERE " + this.objectType + "__c = :objectId ORDER BY CreatedDate ASC");
    }

    public PageReference send() {
        if (this.message == null || this.message == "") {
            return null;
        }
        String messageTo = String.valueOf(this.record.get("Phone")).replace("+", "");
        String messageFrom = String.valueOf(this.user.MobilePhone).replace("+", "");
        String accountId = this.objectType == "account" ? this.objectId : null;
        String leadId = this.objectType == "lead" ? this.objectId : null;
        String timestamp = String.valueOf(Datetime.Now().getTime());

        //String response = "OK";
        String response = WhatsAppUtilities.sendMessage(message, messageFrom, messageTo, accountId, leadId, timestamp);

        if (response == "OK") {
            WhatsAppUtilities.createMessage(this.message, accountId, leadId, timestamp);
            this.statusMessage = "Message Sent";
            this.message = "";
        } else {
           this.statusMessage = response;
           this.showStatus = true;
        }
        this.messages = getMessages();
        return null;
    }

    public PageReference refresh() {
        this.messages = getMessages();
        return null;
    }
    }
Second is utility class to work with our controller. SendMessageFuture is anotated future so that we are able to use it from a trigger. Imagine we want to send an automatic message once a lead meets certain criteria, e.g. has phone in correct format.
public class WhatsAppUtilities {

    public static String sendMessage(String message, String strFrom, String strTo, String accountId, String leadId, String cid) {
        HttpRequest request = WhatsAppUtilities.prepareChatRequest(message, strFrom, strTo, cid);
        Http http = new Http();
        HttpResponse response = http.send(request);
        return response.getStatus();
    }

    @future(callout=true)
    public static void sendMessageFuture(String message, String strFrom, String strTo, String accountId, String leadId, String cid) {
        String response = sendMessage(message, strFrom, strTo, accountId, leadId, cid);
        if (response == "OK") {
            WhatsAppUtilities.createMessage(message, accountId, leadId, cid);
        } else {
            /*Expand as needed*/
            System.debug("Message not created: " + response);
        }
    }

    public static HttpRequest prepareChatRequest(String message, String strFrom, String strTo, String cid) {
        String token = "SAMPLE"; /*Your token goes here*/

        String url = "https://www.waboxapp.com/api/send/chat";
        url += "?token=" + token;
        url += "&uid=" + strFrom.replace("+","");
        url += "&to="  + strTo.replace("+","");
        url += "&text=" + EncodingUtil.urlEncode(message,"UTF-8");
        url += "&custom_uid=" + cid;

        HttpRequest request = new HttpRequest();
        request.setMethod("GET");
        request.setEndpoint(url);
        return request;
    }

    public static void createMessage(String message, String accountId, String leadId, String cid) {
        WhatsAppMessage__c msg = new WhatsAppMessage__c(Account__c = accountId, Lead__c = leadId, Message__c = message, Status__c = "sent", CID__c = cid);
        insert msg;
    }
}
Additionally, once the lead is converted to an Account we want to keep all the messages with the convcerted record. Let’s have a trigger and a handler class that will transfer the messages from lead to account.
trigger Lead on Lead (after delete, after insert, after undelete, after update, before delete, before insert, before update) {

    Handler_Lead handler = new Handler_Lead(Trigger.isExecuting);

    if (Trigger.isBefore) {
        /* INSERT */
        if (Trigger.isInsert) {
            handler.onBeforeInsert(Trigger.new);
        }
        /* UPDATE */
        if (Trigger.isUpdate) {
            handler.onBeforeUpdate(Trigger.old, Trigger.new, Trigger.OldMap, Trigger.NewMap);
        }
        /* DELETE */
        if (Trigger.isDelete) {
            handler.onBeforeDelete(Trigger.old, Trigger.oldMap);
        }
    } else {
        /* INSERT */
        if (Trigger.isInsert) {
            handler.onAfterInsert(Trigger.new, Trigger.newMap);
        }
        /* UPDATE */
        if (Trigger.isUpdate) {
            handler.onAfterUpdate(Trigger.old, Trigger.new, Trigger.oldMap, Trigger.newMap);
        }
        /* DELETE */
        if (Trigger.isDelete) {
            handler.onAfterDelete(Trigger.old, Trigger.oldMap);
        }
        /* UNDELETE */
        if (Trigger.isUndelete) {
            handler.onAfterUndelete(Trigger.new);
        }
    }
}
public with sharing class Handler_Lead {

    private static Set<Id> processedIds;
    private Boolean isExecuting;

    public Handler_Lead(Boolean isExecuting){
        this.isExecuting = isExecuting;
        if (processedIds == null) {
            processedIds = new Set<Id>();
        }
    }

    public void onBeforeInsert(List<Opportunity> triggerNew) {}

    public void onBeforeUpdate(List<Opportunity> triggerOld , List<Opportunity> triggerNew , Map<Id,Opportunity> triggerOldMap , Map<Id,Opportunity> triggerNewMap) {
    }

    public void onBeforeDelete(List<Opportunity> triggerOld , Map<Id,Opportunity> triggerOldMap) {}

    public void onAfterInsert(List<Opportunity> triggerNew , Map<Id,Opportunity> triggerNewMap) {}

    public void onAfterUpdate(List<Opportunity> triggerOld , List<Opportunity> triggerNew , Map<Id,Opportunity> triggerOldMap , Map<Id,Opportunity> triggerNewMap) {
        if (mustBeExecuted(triggerNewMap.keySet())) {
            transferMessagesLeadToAccount();
        }
    }

    public void onAfterDelete(List<Opportunity> triggerOld , Map<Id,Opportunity> triggerOldMap) {}

    public void onAfterUndelete(List<Opportunity> triggerNew) {}

    private Boolean mustBeExecuted(Set<Id> ids) {
        if (Trigger.isBefore) {
            if (processedIds.containsAll(ids)) {
                return false;
            } else {
                return true;
            }
        } else {
            if (!processedIds.containsAll(ids)) {
                processedIds.addAll(ids);
                return true;
            } else {
                return false;
            }
        }
    }

    private static void transferMessagesLeadToAccount() {
        // Change the related record ID here according to your needs.
    }
}
Lastly, let’s design a simple page that will display the contents of the chat and give us the ability to send a message. We can also use CometD to be able to see changes as we get the updates from Waboxapp.
<apex:page controller="WhatsAppController">
    <script src="//code.jquery.com/jquery-1.11.1.min.js"></script>
    <script src="//netdna.bootstrapcdn.com/bootstrap/3.0.0/js/bootstrap.min.js"></script>
    <link href="//netdna.bootstrapcdn.com/bootstrap/3.0.0/css/bootstrap.min.css" rel="stylesheet" id="bootstrap-css" />
    <apex:form >
        <apex:sectionHeader title="Chat with {!name} using WhatsApp"/>
        <apex:pageBlock id="form">
            <apex:outputPanel id="chat">
                <div class="row">
                    <div class="col-sm-6 col-sm-offset-3 frame">
                        <ul class="whatschat">
                            <apex:repeat var="m" value="{!messages}">
                                <li style="width:100%" id="{!m.Id}">
                                <div class="{!IF(m.Status__c == 'sent','msj', 'msj-rta')} macro">
                                    <apex:outputText rendered="{!m.Status__c == 'sent'}">
                                        <div class="avatar"><img class="img-circle" style="width:50px;" src="{!m.createdby.FullPhotoUrl}" /></div>
                                    </apex:outputText>
                                    <div class="text {!IF(m.Status__c == 'sent','text-l', 'text-r')} ">
                                        <p>{!m.Message__c}</p>
                                        <p><small>
                                            <apex:outputText value="{0,date,MM'/'dd'/'yyyy hh':'mm a}">
                                                <apex:param value="{!m.CreatedDate}" />
                                            </apex:outputText>
                                            <apex:outputText rendered="{!AND(m.Ack__c == 'not sent',m.Status__c == 'sent')}">
                                                <span class="ack not-sent"></span>
                                            </apex:outputText>
                                            <apex:outputText rendered="{!AND(m.Ack__c == 'sent',m.Status__c == 'sent')}">
                                                <span class="ack sent"></span>
                                            </apex:outputText>
                                            <apex:outputText rendered="{!AND(m.Ack__c == 'delivered',m.Status__c == 'sent')}">
                                                <span class="ack delivered"></span>
                                            </apex:outputText>
                                            <apex:outputText rendered="{!AND(m.Ack__c == 'read',m.Status__c == 'sent')}">
                                                <span class="ack read"></span>
                                            </apex:outputText>
                                        </small></p>
                                    </div>
                                    <apex:outputText rendered="{!m.Status__c == 'received'}">
                                        <div class="avatar" style="padding:0px 0px 0px 10px !important">
                                            <img class="img-circle" style="width:50px;" src="/profilephoto/005/F" />
                                        </div>
                                    </apex:outputText>
                                    </div>
                                </li>
                            </apex:repeat>
                        </ul>
                        <div>
                            <div class="msj-rta macro">
                                <div class="text text-r" style="background:whitesmoke !important">
                                    <apex:inputText html-class="mytext" value="{!message}"/>
                                </div>
                            </div>
                            <div style="padding:10px;">
                                <span class="send glyphicon glyphicon-share-alt"></span>
                            </div>
                        </div>
                    </div>
                </div>
                <script>
                    j$ = jQuery.noConflict();
                    j$(".mytext").on("keydown", function(e){
                        if (e.which == 13){
                            e.preventDefault();
                            var text = j$(this).val();
                            if (text !== ""){
                                CallSend();
                                j$(this).val('');
                            }
                            return false;
                        }
                    });

                    j$('span.send').click(function(){
                        j$(".mytext").trigger({type: 'keydown', which: 13, keyCode: 13});
                    })

                    function afterRerender(){
                        j$(".mytext").focus();
                        var ul = j$("ul.whatschat");
                        ul.scrollTop(ul.prop("scrollHeight"));
                    }
                  </script>
            </apex:outputpanel>
            <apex:actionFunction name="CallSend" action="{!send}" rerender="msgBlock,chat" onComplete="afterRerender();" />
            <apex:actionFunction name="CallRefresh" action="{!refresh}" rerender="chat" onComplete="afterRerender();" />
        </apex:pageBlock>
        <apex:pageBlock title="Status" id="msgBlock">
            <apex:outputText >
                <div style="height: 20px;">
                    <span class="status" style="color:#51a284;">{!statusMessage}</span>
                </div>
            </apex:outputText>
        </apex:pageBlock>
    </apex:form>
    <script>
        setInterval(function(){
            if(j$('span.status').text().length){
                setTimeout(function(){
                    j$('span.status').fadeOut(500, function(){j$('span.status').text('')});
                }, 2000);
            }
        },1500);
    </script>
</apex:page>
Waboxapp
Once you are registered and logged in with Waboxapp
- Dashboard. Here you’ll find the messages count and the monthly quota forecast.
- My Account. Customer data, payment method, invoicing data including invoices history.
- My Phones. All the used phone numbers with their statuses. You can see phone related information plus a phone can be disconnected here.
Waboxapp extension for Chrome
- Next step is to install the Waboxapp plugin for Chrome.
- Go to phones tab where you’ll find your API token.
- Click on the icon in Chrome and insert your token.
- Go to web.whatsapp.com.
- Login using your whatsapp account.
** It is important that the phone is logged in at web.whatsapp.com during message exchange. Also if you are sending messages in a trigger the phone must be logged in. **
Conclusion
When it comes to integrating with Whatsapp using third party apps there are some advantages and limitations, however in my opinion the pros outweigh the cons. Waboxapp provides a way to quickly develop this functionality. Given that Whatsapp is an integral part of many people’s lives to have the ability to use this way of comunication in your buiseness may give you the edge over your competitors.